×
- Live Chat
- 1-888-905-9199


My Garage
My Account
Cart
Genuine Toyota Echo Tie Rod End
Steering Rod End- Select Vehicle by Model
- Select Vehicle by VIN
Select Vehicle by Model
orMake
Model
Year
Select Vehicle by VIN
For the most accurate results, select vehicle by your VIN (Vehicle Identification Number).
5 Tie Rod Ends found
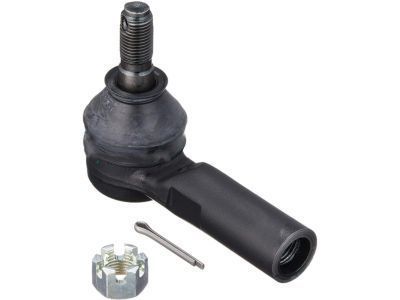
Toyota Echo Tie Rod End Sub-Assembly, Left
Part Number: 45046-19175$52.23 MSRP: $73.01You Save: $20.78 (29%)Ships in 1-3 Business DaysToyota Echo Tie Rod End Sub-Assembly, Right
Part Number: 45046-59026$55.80 MSRP: $78.00You Save: $22.20 (29%)Ships in 1-3 Business DaysToyota Echo Tie Rod End Sub-Assembly, Left
Part Number: 45047-59026$55.80 MSRP: $78.00You Save: $22.20 (29%)Ships in 1-3 Business DaysToyota Echo Tie Rod End Sub-Assembly, Right
Part Number: 45046-59025$55.80 MSRP: $78.00You Save: $22.20 (29%)Ships in 1-3 Business DaysToyota Echo Tie Rod End Sub-Assembly, Left
Part Number: 45047-59025$55.80 MSRP: $78.00You Save: $22.20 (29%)Ships in 1-3 Business Days
Toyota Echo Tie Rod End
If you are in demand for superior quality and affordable OEM Toyota Echo Tie Rod End, then shop with us! We own a wide range of the reduced-priced genuine Toyota Echo Tie Rod End. You can purchase in confidence as all parts come with a manufacturer's warranty. Any issues with our products? No need to worry as we have a hassle-free return policy to guide you every step of the way.
Toyota Echo Tie Rod End Parts Questions & Experts Answers
- Q: How to remove and refit a tie-rod end balljoint on Toyota Echo?A: A balljoint separator tool will be required for this operation, and where applicable, Nyloc-type self-locking nuts must be renewed on refitting. Begin by slackening the relevant front wheel nuts, applying the handbrake, jacking up the front of the car, and securely supporting it on axle stands before removing the roadwheel. Next, pull out the split pin, slacken the tie-rod end balljoint nut, and unscrew it as far as the ends of the threads, noting that the tie-rod end nut and split pin may be corroded, requiring some persuasion for removal. Disconnect the tie-rod end balljoint from the swivel hub using the balljoint separator tool while keeping the nut fitted to protect the threads, taking care not to damage the balljoint rubber seal. Once released, remove the balljoint nut. If the same tie-rod is to be refitted, mark its position relative to the steering rack, slacken the tie-rod end locknut, and unscrew the tie-rod end from the tie-rod, counting the number of turns necessary for removal. For refitting, screw the tie-rod end onto the tie-rod the number of turns noted during removal or until the marks line up, then tighten the locknut while holding the balljoint in position. Engage the tie-rod end balljoint pin with the swivel hub, then fit the nut, tightening it to the specified torque and fitting a new split pin, with the option to tighten the nut by up to an extra 60° if necessary until the split pin fits. Finally, refit the roadwheel, lower the car to the ground, and tighten the wheel nuts, followed by checking the front wheel alignment at the earliest opportunity.


