Make sure this part fits

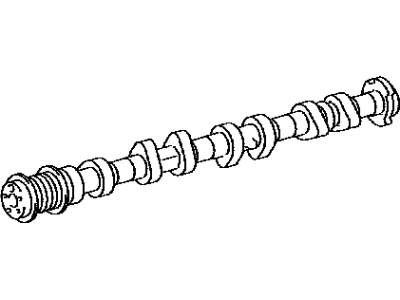
Toyota 13501-36030 CAMSHAFT Sub-Assembly, N

2012-2018 Toyota 1350136030

Customer Questions & Expert Answers (6)
Toyota 13501-36030 CAMSHAFT Sub-Assembly, N
  • Part Description
    CAMSHAFT
  • Part Name Code
    13511
  • Manufacturer
    Toyota
Make sure this part fits
$345.90 MSRP: $495.99
You Save: $150.09 (31%)
Ships in 1-3 Business Days
1
ADD TO CART
  • Related Parts
  • Product Specifications
  • Vehicle Fitment
  • Customer Questions & Expert Answers
  • Product Specifications

    BrandGenuine Toyota
    Part Name Code13511
    Manufacturer Part Number13501-36030
    Part DescriptionCAMSHAFT
    Item Weight5.70 Pounds
    ConditionNew
    Fitment TypeDirect Replacement
    ManufacturerToyota
    SKU13501-36030
    WarrantyThis genuine Toyota part is guaranteed by Toyota's factory warranty.
    Shipping & ReturnShipping Policy Return Policy
    Warning: California’s Proposition 65
  • Vehicle Fitment

    Year Make Model Trim & Engine Important vehicle option details
    2013-2018 Toyota AvalonLimited, XLE, XLE Premium, XLE Touring Or Touring|4 Cyl 2.5L, 6 Cyl 3.5L2ARFXE, 2GRFE; 2ARFXE, 2GRFE; AVX40L-AEXGBA, AVX40L-AEXPBA, GSX40L-AETGKA, GSX40L-AETPKA, GSX40L-AETQKA
    2012-2017 Toyota CamryLE, N, SE, XLE, XSE|4 Cyl 2.5L, 6 Cyl 3.5L2ARFE, 2ARFXE, 2GRFE; 2ARFE, 2ARFXE, 2GRFE; ASV50L-CETEKA, ASV50L-CETGKA, ASV50L-CETNKA, ASV50L-CETPKA, ASV50L-CETSKA, AVV50L-CEXGBA, AVV50L-CEXNBA, AVV50L-CEXSBA, GSV50L-CETGKA, GSV50L-CETSKA
    2015-2018 Toyota RAV4LE, Limited, SE, XLE|4 Cyl 2.5L2ARFE, 2ARFXE; 2ARFE, 2ARFXE; ASA42L-ANTGKA, ASA42L-ANTMKA, ASA42L-ANTSKA, ASA42L-ANTXKA, ASA44L-ANTGKA, ASA44L-ANTMKA, ASA44L-ANTSKA, ASA44L-ANTXKA, AVA44L-ANXGBA, AVA44L-ANXGBK, AVA44L-ANXMBA, AVA44L-ANXMBK, AVA44L-ANXSBA, AVA44L-ANXSBK
  • Customer Questions & Expert Answers

    Q:
    Does it fit my car? Posted by ToyotaPartsDeal Specialist
    A:
    You can Select Your Vehicle to check if 13501-36030 fits your vehicle.
    Posted by ToyotaPartsDeal Specialist
    Q:
    How to remove and install a camshaft on Four cylinder engine on Toyota Camry? Posted by Customer
    A:
    Prior to the camshaft removal, it's crucial to disconnect the negative battery terminal and remove the valve cover. Ensure the engine is at TDC for the number 1 cylinder and mark the timing chain links at the camshaft sprocket timing marks. Loosen the camshaft sprocket bolts while holding the camshafts, and then proceed to remove the timing chain tensioner, camshaft sprocket retainer bolts, and camshaft sprockets while being cautious of the Variable Valve Timing (VVT) actuator's position. In 2009 and earlier models, verify the markings on the camshaft bearing caps, followed by careful loosening and detachment of the caps to remove the camshaft(s). The lifters should also be removed and labeled accordingly. For 2010 and later models, a different process is involved, including the removal of the camshaft housing, rocker arms, and lash adjusters. After removal, thorough inspection of components, including camshafts, camshaft bearings, lifters, and more, is essential, along with measurements to ensure they meet specifications. During installation, apply camshaft installation lubricant to camshaft lobes and journals. In 2009 and earlier models, reinstall the camshafts, camshaft bearing caps, and timing chain with proper alignment, followed by tightening the camshaft sprocket bolts and installing the timing chain tensioner. For 2010 and later models, installation involves placing the lash adjusters, rocker arms, camshaft bearings, and camshaft housing back into position with precise torque sequences. Once camshaft housings are sealed, reinstall camshaft sprockets, timing chain, and timing chain cover. Finally, reassembly continues in the reverse order of removal, ensuring proper camshaft endplay, alignment, and other critical factors are checked before completing the procedure.
    Posted by ToyotaPartsDeal Specialist
    Q:
    How to remove the Camshaft and Rocker Arm on V6 engine on Toyota Camry? Posted by Customer
    A:
    This procedure requires engine and transaxle removal. Drain engine oil and coolant, then remove timing chains and sprockets. Ensure correct camshaft positioning before removal. Gradually remove bearing cap bolts, then housing bolts. Remove bearing caps and camshafts, and pry off camshaft housing. Remove and inspect rocker arms and lash adjusters. Check cam lobes and bearing journals for damage. Measure camshaft lobe and journal dimensions, replacing any outside specified limits. Check oil clearance for each camshaft journal, replacing if necessary. Lubricate and reinstall lash adjuster bores, rocker arms, camshafts, bearing caps, and housing. Apply RTV silicone sealer to sealing surfaces and tighten bolts. Repeat for front cylinder bank. Reinstall timing chains, cover, and components. Check for resistance by hand-rotating crankshaft. Refill oil and coolant, reconnect battery, start engine, and check for leaks.
    Posted by ToyotaPartsDeal Specialist
    Q:
    How to remove, inspect, and install the camshaft and Rocker Arm on Toyota Rav4? Posted by Customer
    A:
    First of all you have to loosen the cable being connected with the negative terminal of the battery and then take out the engine along with the valve cover and of course make sure that the engine is at TDC what pertains to the number one cylinder and this can be checked by lining up the timing mark which is located at the crankshaft pulley and the "O"mark on the cover for timing chain. Ensure that the marks' front and rear on the camshaft sprocket align with the top of the timing chain cover, and paint the chain links of the upper timing marks. With the help of a wrench, lock the camshaft sprockets so that they do not rotate while removing the bolts of sprockets, then take away the timing chain cover and the tensioner. Rearm the timing chain away from the sprockets and take out the camshaft sprockets; notice the integration of the Variable Valve Timing (VVT) actuator. For the purpose of excluding foreign objects from the engine, put a rag into the opening of the timing chain cover. Tighten the camshaft housing bearing cap bolts uniformly in the sequence mentioned and then, remove the camshaft housing lightly and further, loosen the camshaft bearing cap bolts uniformly in the sequence stated above. If required, release or unbolt the bearing caps and inserts from the No.1 bearing cap together with the oil control filter, and the camshafts. Take off the rocker arms and lash adjusters from the cylinder head, and check the wear of various parts such as; camshaft sprockets and chains. Before the camshafts are pulled out, a camshaft end play check has to be done with the aid of a dial indi-cator, depending on the manufacturer, the cam-shaft bearing surfaces also have to be checked for any signs of wear. It is necessary to check each camshaft bearing journal outside diameter and each camshaft bearing inside diameter to define oil clearance and is within the prescriptions. You should record the height of every camshaft lobe and also check the run out on every lobe with the dial indicator. This can be done on the rocker arms and lash adjusters with a view of establishing whether they are worn out or not. For reassemble, apply the engine oil in the lash adjusters and then he installed them together with the rocker arms. Place the camshaft bearings to the camshaft housing, apply oil to the camshaft asperities and journals and then place the camshaft. Place the oil control valve filter into the No.1 bearing cap, then put in and fasten the camshaft bearing caps. Ensure that the rocker arms are correctly located and align the dowel pins to the necessary angles, the camshaft housing mounting surface should be clean before applying seal packing. Place the camshaft housing on the cylinder head and fasten the mounting screws and next put the sprockets, timing chain, and the timing chain cover back in reverse order.
    Posted by ToyotaPartsDeal Specialist
    Q:
    What steps are involved in the final reassembly after camshaft installation for the 2007 Toyota Avalon? Posted by Customer
    A:
    In the final reassembly, follow these steps:Ensure proper camshaft endplay and alignment.Reassemble components in the reverse order of removal.Verify critical factors before completing the procedure.
    Posted by ToyotaPartsDeal Specialist
    See expert answers on similar Camshaft
    Q:
    What should be done with the rocker arms and lash adjusters during this procedure for the 2012 Toyota Avalon? Posted by Customer
    A:
    Remove all rocker arms and lash adjusters and place them in a labeled box. Inspect each rocker and lash adjuster arm for wear.
    Posted by ToyotaPartsDeal Specialist
    See expert answers on similar Camshaft
    If you have any questions about this product, please don't hesitate to ask us. We will be happy to help you!

Genuine Toyota Part 13501-36030, the Right Choice

To ensure reliability, purchase Toyota part # 13501-36030 CAMSHAFT Sub-Assembly, N. It is sometimes referred to as Toyota Camshaft. For unrivaled quality, OEM parts are the ultimate choice. These parts are manufactured by Toyota's official factory using top-quality materials and undergo strict testing procedures, ensuring outstanding dependability and long-lasting durability. This part fits 2013-2018 Toyota Avalon, 2012-2017 Toyota Camry, 2015-2018 Toyota RAV4.

ToyotaPartsDeal.com is a leading supplier of genuine Toyota parts and accessories such as Toyota 1350136030 CAMSHAFT Sub-Assembly, N. In need of OEM Toyota parts? Look no further than our extensive inventory of genuine Toyota parts, competitively priced to be highly exceptional in the market. They are all manufacturer-warrantied. Add to that, our easy return policy and swift delivery service, and your shopping experience promises to be the great pleasant ever. For detailed Toyota parts information, click here.

Why choose Toyota Parts Deal

  • Dedicated Service

    Your complete satisfaction is our #1 goal

  • Lowest Prices

    Best deals on genuine OE parts from dealerships

  • Fast Delivery

    Orders are processed and delivered promptly