Make sure this part fits

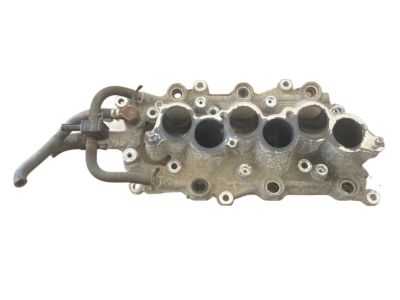
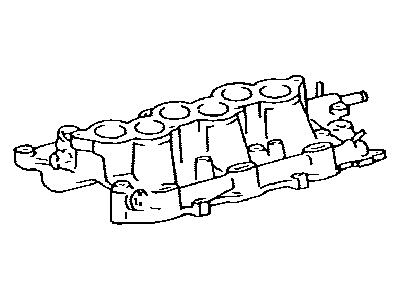
Toyota 17101-20031 Manifold, Intake

2000-2004 Toyota 1710120031

Customer Questions & Expert Answers (10)
Toyota 17101-20031 Manifold, Intake
  • Part Description
    Manifold, Intake
  • Part Name Code
    17111
  • Replaces
    17101-0A030, 17101-20030
  • Manufacturer
    Toyota
Make sure this part fits
$301.84 MSRP: $432.82
You Save: $130.98 (31%)
Ships in 1-3 Business Days
1
ADD TO CART
  • Related Parts
  • Product Specifications
  • Vehicle Fitment
  • Customer Questions & Expert Answers
  • Product Specifications

    BrandGenuine Toyota
    Part Name Code17111
    Manufacturer Part Number17101-20031
    Part DescriptionManifold, Intake
    Other NamesIntake Manifold
    Manufacturer Note(J)
    Item Dimensions22.3 x 14.4 x 5.1 inches
    Item Weight8.50 Pounds
    ConditionNew
    Fitment TypeDirect Replacement
    Replaces17101-0A030, 17101-20030
    ManufacturerToyota
    SKU17101-20031
    WarrantyThis genuine Toyota part is guaranteed by Toyota's factory warranty.
    Shipping & ReturnShipping Policy Return Policy
    Warning: California’s Proposition 65
  • Vehicle Fitment

    Year Make Model Trim & Engine Important vehicle option details
    2000-2004 Toyota AvalonXL, XLS|6 Cyl 3.0L1MZFE; 1MZFE; MCX20L-AEPGKA, MCX20L-AEPGKK, MCX20L-AEPNKA, MCX20L-AEPNKK, MCX20L-AESGKA, MCX20L-AESNKA
    2001-2004 Toyota Highlander6 Cyl 3.0L1MZFE; 1MZFE; MCU20L-BWPNKA, MCU25L-BWPNKA
    2000-2003 Toyota SiennaCE, LE|6 Cyl 3.0L1MZFE; 1MZFE; MCL10L-GFSDKA, MCL10L-GFSDKK, MCL10L-GFSGKA, MCL10L-GFSGKK, MCL10L-PFSDKA, MCL10L-PFSDKK, MCL10L-PFSGKA, MCL10L-PFSGKK, MCL10L-SESDKA, MCL10L-SESDKK
  • Customer Questions & Expert Answers

    Q:
    Does it fit my car? Posted by ToyotaPartsDeal Specialist
    A:
    You can Select Your Vehicle to check if 17101-20031 fits your vehicle.
    Posted by ToyotaPartsDeal Specialist
    Q:
    How to remove and install an intake manifold on V6 engine on 1997 through 2001 Toyota Avalon? Posted by Customer
    A:
    Start by relieving fuel system pressure and disconnecting the battery cable. Drain coolant and remove the V-bank cover, air cleaner assembly, and disconnect connectors and hoses from the throttle body. Remove the throttle body if needed. On Solara models, remove the front suspension brace. Disconnect the EGR pipe and unbolt the intake plenum braces. Remove the bolts and nuts holding the plenum to the lower intake manifold and lift off the plenum. To remove the lower intake manifold, disconnect connectors from the fuel injectors and disconnect the air assist and heater hoses. Detach the fuel line and remove the eight mounting nuts/bolts. Replace the water transfer hose if the intake manifold is removed. To install, clean the mating surfaces and install new gaskets. Tighten the nuts/bolts. Reinstall the remaining parts in reverse order and refill the cooling system. Check for leaks.
    Posted by ToyotaPartsDeal Specialist
    Q:
    How to remove and install an intake manifold on Four cylinder engine on 1997 through 2001 Toyota Avalon? Posted by Customer
    A:
    Disconnect the negative cable from the battery. Loosen the air cleaner hose clamp at the throttle body and remove the air cleaner top (four clamps), resonator, and hose. Disconnect the coolant hoses from the throttle body and plug them to prevent coolant leakage. Label and detach any wire harness and control cables or hoses connected to the intake manifold. Press in on the clips to release the wiring harness retainers. Disconnect the two ground straps from the firewall side of the intake manifold, then disconnect the knock sensor. Carefully lift the wire harness over the manifold. Unbolt the intake manifold-to-engine braces. Disconnect the electrical connectors from the coil pack, then remove the mounting bolts and remove the coil pack mount/intake brace. Remove the mounting nuts/bolts, then detach the manifold from the engine. Use a scraper to remove all traces of old gasket material and sealant from the manifold and cylinder head, then clean the mating surfaces with lacquer thinner or acetone. If the gasket was leaking, have the manifold checked for warpage at an automotive machine shop and resurfaced if necessary. Install a new gasket, then position the manifold on the head and install the nuts/bolts. Tighten the nuts/bolts. Work from the center out towards the ends to avoid warping the manifold. Install the remaining parts in the reverse order of removal. Before starting the engine, check the throttle linkage for smooth operation. Check the coolant and add some if necessary to bring it to the appropriate level. Run the engine and check for coolant and vacuum leaks. Road test the vehicle and check for proper operation of all accessories, including the cruise control system.
    Posted by ToyotaPartsDeal Specialist
    Q:
    How to remove and install an intake manifold on Four cylinder engine on 2002 through 2006 Toyota Avalon? Posted by Customer
    A:
    Removal begins with relieving the fuel system pressure, then disconnecting the negative cable from the battery. The air intake duct and resonator are removed, followed by the cowl cover and vent tray. On models with performance suspension, the brace between the shock towers is removed. The fuel rail and injectors are removed as an assembly. The electronic throttle motor connector is disconnected and the throttle body is removed. The PCV and vacuum hoses connected to the rear of the intake manifold are labeled and detached. The vehicle is raised and supported securely on jackstands. Working below the vehicle, the manifold lower mounting bolts are removed. From above, the intake manifold upper mounting nuts and bolts are removed. The manifold, the gasket, and the manifold insulator are removed from the engine. For installation, the mating surfaces of the intake manifold and the cylinder head mounting surface are cleaned with lacquer thinner or acetone. If the gasket shows signs of leaking, the manifold is checked for warpage with a straight edge. If the manifold is warped, it must be replaced. A new gasket is pressed into the grooves on the intake manifold. The manifold and gasket are installed over the studs on the cylinder head. The manifold-to-cylinder head nuts/bolts are tightened in three or four equal steps. Work from the top bolts down to avoid warping the manifold. The remaining parts are installed in the reverse order of removal. The coolant level is checked, adding as necessary. Before starting the engine, the throttle linkage is checked for smooth operation. The engine is run and checked for coolant and vacuum leaks. The vehicle is road tested and checked for proper operation of all accessories, including the cruise control system, if equipped.
    Posted by ToyotaPartsDeal Specialist
    Q:
    How to remove and install an intake manifold on V6 engine on 2002 through 2006 Toyota Avalon? Posted by Customer
    A:
    To remove the upper intake plenum, release the fuel system pressure, and detach the battery cable. Drain the coolant and remove the V-bank cover and air cleaner. Disconnect connectors and hoses from the throttle body, and the throttle motor connector. Remove the suspension brace and intake plenum braces. Remove bolts and nuts holding the plenum to the lower intake manifold. For the lower manifold, disconnect connectors as well as the hoses.
    Posted by ToyotaPartsDeal Specialist
    Q:
    How to remove and install Intake Manifold in Four cylinder engine on Toyota Highlander? Posted by Customer
    A:
    To remove the intake manifold, first relieve the fuel system pressure and disconnect the cable from the negative battery terminal. Next, remove the air intake duct and resonator, followed by the cowl cover assembly. Then, take out the fuel rail and injectors as an assembly. For models from 1999 to 2007, remove the throttle linkage and throttle body from the intake manifold, label and detach the PCV and vacuum hoses connected to the intake manifold, and securely support the vehicle on jackstands. If working on a 4WD model, loosen the right side driveaxle/hub nut and the right front wheel lug nuts before raising the vehicle. Drain the transfer case lubricant, remove the right side driveaxle, and separate the transfer case mount from the transfer case, removing the transfer case mounting brace. For all models, work below the vehicle to remove the manifold lower mounting bolts, then from above, remove the intake manifold upper mounting nuts and bolts, and take out the manifold, gasket, and manifold insulator from the engine. For models from 2008 and later, remove the engine cover, disconnect the vacuum hoses and ventilation tubes from the intake manifold, and remove the throttle body with the electronic throttle actuator. Additionally, remove the windshield wiper motor, brake booster vacuum bracket, and outer cowl top assembly, then disconnect and remove the main harness connector to the intake manifold and tumble control valves. Apply battery voltage to the tumble control valve electrical connector to close the valve, preventing damage during removal. Remove the intake manifold support bracket and disconnect the vacuum switching valve assembly electrical connector, then unscrew the intake manifold mounting fasteners and remove the manifold. For installation, clean the mating surfaces of the intake manifold and cylinder head mounting surface, checking the gasket for leaks and the manifold for warpage. Press a new gasket into the grooves on the intake manifold, install the manifold and gasket over the studs on the cylinder head, and tighten the manifold-to-cylinder head nuts/bolts in three or four equal steps from the center outwards. Reinstall the remaining parts in reverse order, check the coolant level, refill the transfer case for 4WD models, and ensure the throttle linkage operates smoothly before starting the engine to check for coolant and vacuum leaks.
    Posted by ToyotaPartsDeal Specialist
    Q:
    How to remove and install Intake Manifold in 3.0L and 3.3L V6 engine on Toyota Sienna? Posted by Customer
    A:
    Wait until the engine is completely cool before beginning this procedure. To remove the upper intake plenum, relieve the fuel system pressure and disconnect the negative cable from the battery. Drain the coolant into a clean container, then remove the V-bank cover by using an Allen wrench to take out the two bolts and pulling it up, noting that models from 1998 to 2000 have clips under the "finned" area while later models have three nuts and one large wingnut. Next, remove the air cleaner assembly and disconnect the electrical connectors, vacuum, and coolant bypass hoses from the throttle body, followed by disconnecting the throttle linkage; the throttle body can remain attached unless cleaning or gasket service is needed. For models with EGR, disconnect the EGR pipe at the intake plenum, unbolt the brace to the throttle body and engine lifting, then remove the bolts and nuts holding the plenum to the lower intake manifold and lift it off. For the lower intake manifold, disconnect the electrical connectors from the fuel injectors, noting that the manifold can be removed with the injectors and fuel rails in place or removed depending on the work required. Detach the air assist and heater hoses at the left end of the intake manifold and detach the fuel line from the fuel rail, using only your hand for the quick-connect fittings. Remove the eight mounting nuts/bolts to detach the manifold from the engine, taking care not to pry between the gasket mating surfaces to avoid damage. A water transfer hose should be replaced whenever the intake manifold is off for other repairs, as it is difficult to access. For installation, use a scraper to remove all traces of old gasket material and sealant from the manifold and cylinder heads, then clean the mating surfaces with lacquer thinner or acetone. Install new gaskets, position the manifold on the engine ensuring the gaskets haven't shifted, and install the nuts/bolts, tightening them in three or four equal steps according to the specified sequence. Install the remaining parts in reverse order of removal, using a new gasket between the intake manifold and the plenum, then refill the cooling system and run the engine to check for fuel, vacuum, and coolant leaks.
    Posted by ToyotaPartsDeal Specialist
    Q:
    What should be done after installing the upper intake manifold for the 2003 Toyota Highlander? Posted by Customer
    A:
    Install the remaining parts in the reverse order of removal, using a new gasket between the lower intake manifold and the upper intake manifold.
    Posted by ToyotaPartsDeal Specialist
    Q:
    What is the next step after removing the throttle body for the 2015 Toyota Highlander? Posted by Customer
    A:
    Disconnect all wiring and hoses from the upper intake manifold.
    Posted by ToyotaPartsDeal Specialist
    Q:
    How do I detach the lower intake manifold for the 2006 Toyota Sienna? Posted by Customer
    A:
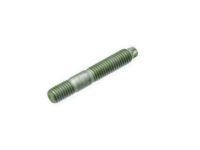
    Remove the 10 lower intake manifold bolts and then remove the lower intake manifold.
    Posted by ToyotaPartsDeal Specialist
    If you have any questions about this product, please don't hesitate to ask us. We will be happy to help you!

Genuine Toyota Part 17101-20031, the Right Choice

To ensure reliability, purchase Toyota part # 17101-20031 Manifold, Intake. It is sometimes referred to as Toyota Intake Manifold. For unrivaled quality, OEM parts are the ultimate choice. These parts are manufactured by Toyota's official factory using top-quality materials and undergo strict testing procedures, ensuring outstanding dependability and long-lasting durability. This part fits 2000-2004 Toyota Avalon, 2001-2004 Toyota Highlander, 2000-2003 Toyota Sienna.

ToyotaPartsDeal.com is a leading supplier of genuine Toyota parts and accessories such as Toyota 1710120031 Manifold, Intake. In need of OEM Toyota parts? Look no further than our extensive inventory of genuine Toyota parts, competitively priced to be highly exceptional in the market. They are all manufacturer-warrantied. Add to that, our easy return policy and swift delivery service, and your shopping experience promises to be the great pleasant ever. For detailed Toyota parts information, click here.

Why choose Toyota Parts Deal

  • Dedicated Service

    Your complete satisfaction is our #1 goal

  • Lowest Prices

    Best deals on genuine OE parts from dealerships

  • Fast Delivery

    Orders are processed and delivered promptly