Make sure this part fits

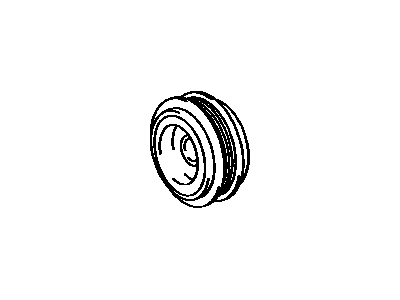
Toyota 13408-0A010 PULLEY, Crankshaft

1994-2011 Toyota 134080A010

Customer Questions & Expert Answers (10)
Toyota 13408-0A010 PULLEY, Crankshaft
  • Part Description
    PULLEY, Crankshaft
  • Part Name Code
    13471
  • Replaced By
    13408-20010
  • Manufacturer
    Toyota
Make sure this part fits
$426.69 MSRP: $628.08
You Save: $201.39 (33%)
Ships in 1-3 Business Days
1
ADD TO CART
  • Related Parts
  • Product Specifications
  • Vehicle Fitment
  • Customer Questions & Expert Answers
  • Product Specifications

    BrandGenuine Toyota
    Part Name Code13471
    Manufacturer Part Number13408-0A010
    Part DescriptionPULLEY, Crankshaft
    Manufacturer Note(L)
    Item Dimensions8.0 x 3.6 x 8.3 inches
    Item Weight5.50 Pounds
    ConditionNew
    Fitment TypeDirect Replacement
    ManufacturerToyota
    SKU13408-0A010
    WarrantyThis genuine Toyota part is guaranteed by Toyota's factory warranty.
    Shipping & ReturnShipping Policy Return Policy
    Warning: California’s Proposition 65
  • Vehicle Fitment

    Year Make Model Trim & Engine Important vehicle option details
    1995-2004 Toyota AvalonXL, XLS|6 Cyl 3.0L1MZFE; 1MZFE; MCX10L-AEPGKA, MCX10L-AEPGKK, MCX10L-AEPNKA, MCX10L-AEPNKK, MCX10L-AESGKA, MCX10L-AESGKK, MCX10L-AESNKA, MCX10L-AESNKK, MCX20L-AEPGKA, MCX20L-AEPGKK, MCX20L-AEPNKA, MCX20L-AEPNKK, MCX20L-AESGKA, MCX20L-AESNKA
    1994-2006 Toyota CamryCE, DX, LE, SE, XLE|4 Cyl 2.2L, 4 Cyl 2.4L, 6 Cyl 3.0L, 6 Cyl 3.3L1MZFE, 2AZFE, 3MZFE, 3VZFE, 5SFE, 5SFNE; 1MZFE, 2AZFE, 3MZFE, 3VZFE, 5SFE, 5SFNE; ACV30L-AEAGKA, ACV30L-AEANKA, ACV30L-AEASKA, ACV30L-AEMNKA, ACV30L-AEMSKA, ACV30L-AEPGKA, ACV30L-AEPNKA, ACV30L-AEPSKA, ACV30L-CEAGKA, ACV30L-CEANKA, ACV30L-CEASKA, ACV30L-CEPGKA, ACV30L-CEPNKA, ACV30L-CEPSKA, MCV10L-AEPGKA, MCV10L-AEPNKA, MCV10L-AEPSKA, MCV10L-CCPNKA, MCV10L-CCPNKK, MCV10L-CCPSKA, MCV10L-CEPDKK, MCV10L-CEPGKA, MCV10L-CEPNKA, MCV10L-CEPNKK, MCV10L-CEPSKA, MCV10L-CWPNKA, MCV10L-CWPNKK, MCV20L-AEPDKK, MCV20L-AEPGKA, MCV20L-AEPGKK, MCV20L-AEPNKA, MCV20L-CEMDKA, MCV20L-CEMNKA, MCV20L-CEPDKK, MCV20L-CEPGKA, MCV20L-CEPGKK, MCV20L-CEPNKA, MCV20L-CEPNKK, MCV30L-AEAGKA, MCV30L-AEANKA, MCV30L-AEASKA, MCV30L-AEPGKA, MCV30L-AEPNKA, MCV30L-AEPSKA, MCV30L-CEAGKA, MCV30L-CEANKA, MCV30L-CEASKA, MCV30L-CEPGKA, MCV30L-CEPNKA, MCV30L-CEPSKA, MCV31L-AEASKA, MCV31L-CEASKA, SXV10L-AEMDKA, SXV10L-AEPDKA, SXV10L-AEPGKA, SXV10L-AEPNKA, SXV10L-CCMDKA, SXV10L-CCMDKK, SXV10L-CCMNKK, SXV10L-CCPDKA, SXV10L-CCPDKK, SXV10L-CCPNKA, SXV10L-CCPNKK, SXV10L-CEMDKA, SXV10L-CEMDKK, SXV10L-CEMNKK, SXV10L-CEPDKA, SXV10L-CEPDKK, SXV10L-CEPGKA, SXV10L-CEPNKA, SXV10L-CEPNKK, SXV10L-CWMDKK, SXV10L-CWPDKA, SXV10L-CWPDKK, SXV10L-CWPNKA, SXV10L-CWPNKK, SXV20L-AEMDKK, SXV20L-AEPDKK, SXV20L-AEPGKA, SXV20L-AEPNKA, SXV20L-AEPNKK, SXV20L-CEMDKA, SXV20L-CEMDKK, SXV20L-CEMNKK, SXV20L-CEPDKA, SXV20L-CEPDKK, SXV20L-CEPGKA, SXV20L-CEPNKA, SXV20L-CEPNKK, SXV23L-AEPNCA, VCV10L-CEMSKA, VCV10L-CEPDKA, VCV10L-CEPGKA, VCV10L-CEPNKA, VCV10L-CEPSKA, VCV10L-CWPNKA, VCV10L-CWPNKK
    2001-2011 Toyota HighlanderGrande, Limited, Sport, STD|4 Cyl 2.4L, 4 Cyl 2.7L, 6 Cyl 3.0L, 6 Cyl 3.3L, 6 Cyl 3.5L1ARFE, 1MZFE, 2AZFE, 2GRFE, 2GRFXE, 3MZFE; 1ARFE, 1MZFE, 2AZFE, 2GRFE, 2GRFXE, 3MZFE; ACU20L-BRPNKA, ACU20L-BWPNKA, ACU25L-BRPNKA, ACU25L-BWPNKA, ASU40L-BRTNKA, GSU40L-BRAGKA, GSU40L-BRAMKA, GSU40L-BRANKA, GSU40L-BRASKA, GSU45L-BRAGKA, GSU45L-BRAMKA, GSU45L-BRANKA, GSU45L-BRASKA, GVU48L-BRXGKA, GVU48L-BRXNKA, MCU20L-BWPNKA, MCU23L-BRANKA, MCU23L-BWANKA, MCU25L-BWPNKA, MCU28L-BRANKA, MCU28L-BWANKA, MHU23L-BRXNKA, MHU23L-BWXNKA, MHU28L-BRXNKA, MHU28L-BWXNKA, MHU48L-BRXMKA, MHU48L-BRXNKA
    1998-2007 Toyota SiennaCE, LE, XLE|6 Cyl 3.0L, 6 Cyl 3.3L, 6 Cyl 3.5L1MZFE, 2GRFE, 3MZFE; 1MZFE, 2GRFE, 3MZFE; GSL20L-PFADKK, GSL20L-PFAEKA, GSL20L-PFAEKK, GSL20L-PFAQKA, GSL20L-PFAQKK, GSL20L-PRADKK, GSL20L-PRAEKA, GSL20L-PRAEKK, GSL20L-PRAQKA, GSL20L-PRAQKK, GSL23L-SBADKA, GSL23L-SBADKK, GSL25L-PFADKK, GSL25L-PFAEKA, GSL25L-PFAEKK, GSL25L-PFAQKA, GSL25L-PFAQKK, MCL10L-GFSDKA, MCL10L-GFSDKK, MCL10L-GFSGKA, MCL10L-GFSGKK, MCL10L-PFSDKA, MCL10L-PFSDKK, MCL10L-PFSGKA, MCL10L-PFSGKK, MCL10L-SESDKA, MCL10L-SESDKK, MCL20L-PFADKK, MCL20L-PFAEKA, MCL20L-PFAEKK, MCL20L-PFAQKA, MCL20L-PFAQKK, MCL20L-PRADKK, MCL20L-PRAEKA, MCL20L-PRAEKK, MCL20L-PRAQKA, MCL20L-PRAQKK, MCL23L-SBADKA, MCL23L-SBADKK, MCL25L-PFADKK, MCL25L-PFAEKA, MCL25L-PFAEKK, MCL25L-PFAQKA, MCL25L-PFAQKK
    1999-2008 Toyota SolaraSE, SLE|4 Cyl 2.2L, 4 Cyl 2.4L, 6 Cyl 3.0L, 6 Cyl 3.3L1MZFE, 2AZFE, 3MZFE, 5SFE; 1MZFE, 2AZFE, 3MZFE, 5SFE; ACV20L-GCMNKA, ACV20L-GCPNKA, ACV20L-GCPNKK, ACV20L-GKPNKA, ACV30L-GCAGKA, ACV30L-GCANKA, ACV30L-GCMNKA, ACV30L-GCPGKA, ACV30L-GCPNKA, MCV20L-GCMNKA, MCV20L-GCMNKK, MCV20L-GCPNKA, MCV20L-GCPNKK, MCV20L-GKPNKA, MCV20L-GKPNKK, MCV31L-GCAGKA, MCV31L-GCANKA, MCV31L-GKAGKA, MCV31L-GKANKA, SXV20L-GCMNKA, SXV20L-GCPNKA, SXV20L-GCPNKK, SXV20L-GKPNKA
  • Customer Questions & Expert Answers

    Q:
    Does it fit my car? Posted by ToyotaPartsDeal Specialist
    A:
    You can Select Your Vehicle to check if 13408-0A010 fits your vehicle.
    Posted by ToyotaPartsDeal Specialist
    Q:
    How to remove the Harmonic Balancer on 1997 through 2001 Toyota Avalon? Posted by Customer
    A:
    Remove the oil pan, pick-up tube, and oil pump. Loosen the harmonic balancer mounting bolts in the recommended sequence, 1/4 turn at a time, until you can unscrew them by hand. Remove the harmonic balancer. Secure the spacers with the harmonic balancer assembly by using wire or twist-ties. Before installing it, make sure to check the harmonic balancer for excessive backlash.
    Posted by ToyotaPartsDeal Specialist
    Q:
    How to install Harmonic Balancer on 1997 through 2001 Toyota Avalon? Posted by Customer
    A:
    After installing, torquing, and checking the crankshaft and pistons/rods, clean the surface of the block and the Harmonic Balancer spacers. Then, place the spacers on the block. Turn the crankshaft until the number 1 piston is at TDC. Align the punch marks on the balance shafts with their corresponding marks on the housing. Place the Harmonic Balancer on the block and install the bolts. Apply hand pressure on the center of the assembly in the indicated direction and tighten the bolts in several steps, following the sequence shown. Position a dial indicator against the end of the number 1 balance shaft and check the shaft endplay while pushing the shaft back and forth by hand. Repeat the check for the number 2 balance shaft and compare your readings to the specifications. If the endplay is excessive, remove the Harmonic Balancer and take it to a dealer service department or other qualified service facility for repair. Check the balancer shaft gear-to-crankshaft gear backlash at the four indicated locations. Rotate the crankshaft several revolutions and return to TDC for the number 1 piston. Check that the punch marks are still aligned. Rotate the engine clockwise until punch mark A lines up with the notch in the balancer housing. Position a lever-type dial indicator on the side of a tooth of the number 1 shaft gear. Lightly twist the number 1 shaft back and forth a few times by hand and, while pressing on the rear of the shaft to take up the endplay, lightly twist the shaft while observing the dial indicator. Compare the results to on-engine balancer backlash. Remove the dial indicator and rotate the engine clockwise until punch mark B on balance shaft 1 lines up with the notch in the housing. Measure backlash at this position and compare the results to on-engine balancer backlash. Repeat the previous steps and compare the results to on-engine balancer backlash. If any of the readings exceed specifications, change the spacer between the block and the balance assembly to obtain proper backlash. To increase backlash, select a thick spacer; select a thinner spacer to reduce backlash. Changing the spacer by 0.0008-inch changes the backlash by 0.0006-inch. Note: Various size spacers are available at your Toyota Dealership.
    Posted by ToyotaPartsDeal Specialist
    Q:
    How to measure backlash in the engine balancer assembly on 1997 through 2001 Toyota Avalon? Posted by Customer
    A:
    The harmonic balancer assembly consists of two shafts contained in an upper and lower aluminum housing assembly. The shafts are geared together, and one of the shafts is geared to the crankshaft. The following procedure applies only when the harmonic balancer assembly is removed from the engine. Do NOT disassemble the harmonic balancer assembly! Start with the punch marks on the number 2 shaft lined up as indicated. The balancer shafts have punch marks and the number 2 housing has alignment notches - start with the shafts aligned, then align the number 2 shaft so that mark D is aligned with the housing. Using locking pliers to hold the number 2 shaft from turning, measure the backlash on the number 1 gear with a dial indicator. Set up the dial Indicator as shown and measure the backlash while applying mild hand pressure on the rear of both shafts, while keeping forward pressure on the rear of both shafts to eliminate thrust play. Compare the backlash to the specifications. Remove the dial indicator and turn the number 2 shaft so that punch mark E now aligns with the case. Measure backlash again compare the results with the specifications. Remove the dial indicator again and turn the number 2 shaft so that punch mark F now aligns with the case. Measure backlash again compare the results with the specifications. If any of the three measurements exceed the specifications, it is suggested that the harmonic balancer assembly be taken to a Toyota dealer or other qualified service facility for further disassembly and repair.
    Posted by ToyotaPartsDeal Specialist
    Q:
    What are the remaining steps after installing the crankshaft pulley for the 2002 Toyota Avalon? Posted by Customer
    A:
    After installing the crankshaft pulley, the remaining steps involve reversing the removal process.
    Posted by ToyotaPartsDeal Specialist
    See expert answers on similar Crankshaft Pulley
    Q:
    How do you install the crankshaft pulley for the 2014 Toyota Highlander? Posted by Customer
    A:
    To install the crankshaft pulley, slide the pulley onto the crankshaft as far as it will go. Then, use a vibration damper installation tool to press the pulley onto the crankshaft. Ensure that the slot (keyway) in the hub is aligned with the Woodruff key in the end of the crankshaft. The crankshaft bolt can also be used to press the crankshaft pulley into position.
    Posted by ToyotaPartsDeal Specialist
    See expert answers on similar Crankshaft Pulley
    Q:
    How are the shafts in the balancer assembly geared together for the 2001 Toyota Solara? Posted by Customer
    A:
    The shafts in the balancer assembly are geared together.
    Posted by ToyotaPartsDeal Specialist
    See expert answers on similar Harmonic Balancer
    Q:
    What are the remaining steps after installing the crankshaft pulley for the 2004 Toyota Solara? Posted by Customer
    A:
    After installing the crankshaft pulley, the remaining steps involve reversing the removal process.
    Posted by ToyotaPartsDeal Specialist
    See expert answers on similar Crankshaft Pulley
    Q:
    How should the balancer mounting bolts be loosened for the 1999 Toyota Solara? Posted by Customer
    A:
    The balancer mounting bolts should be loosened in the recommended sequence, 1/4 turn at a time, until they can be unscrewed by hand.
    Posted by ToyotaPartsDeal Specialist
    See expert answers on similar Harmonic Balancer
    Q:
    What should be done if the gear backlash readings exceed specifications for the 1999 Toyota Solara? Posted by Customer
    A:
    If the gear backlash readings exceed specifications, the spacer between the block and the balance assembly should be changed to obtain proper backlash.
    Posted by ToyotaPartsDeal Specialist
    See expert answers on similar Harmonic Balancer
    If you have any questions about this product, please don't hesitate to ask us. We will be happy to help you!

Genuine Toyota Part 13408-0A010, the Right Choice

To ensure reliability, purchase Toyota part # 13408-0A010 PULLEY, Crankshaft. It is sometimes referred to as Toyota Crankshaft Pulley, Toyota Harmonic Balancer. For unrivaled quality, OEM parts are the ultimate choice. These parts are manufactured by Toyota's official factory using top-quality materials and undergo strict testing procedures, ensuring outstanding dependability and long-lasting durability. This part fits 1995-2004 Toyota Avalon, 1994-2006 Toyota Camry, 2001-2011 Toyota Highlander, 1998-2007 Toyota Sienna.

ToyotaPartsDeal.com is a leading supplier of genuine Toyota parts and accessories such as Toyota 134080A010 PULLEY, Crankshaft. In need of OEM Toyota parts? Look no further than our extensive inventory of genuine Toyota parts, competitively priced to be highly exceptional in the market. They are all manufacturer-warrantied. Add to that, our easy return policy and swift delivery service, and your shopping experience promises to be the great pleasant ever. For detailed Toyota parts information, click here.

Why choose Toyota Parts Deal

  • Dedicated Service

    Your complete satisfaction is our #1 goal

  • Lowest Prices

    Best deals on genuine OE parts from dealerships

  • Fast Delivery

    Orders are processed and delivered promptly